Tag Archives: a printmaking blog

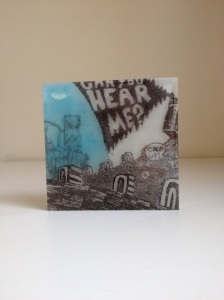
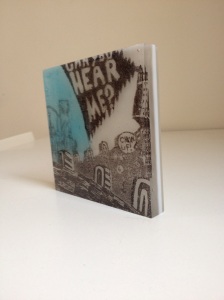
Fused Glass Relief Print

IMG_0616IMG_0620

Can You Hear Me

Fused Glass Relief Print

5″ x 5″ x 3/4″

I know it’s been awhile since my last post, but I’ve been working on a technique that combines relief printing and glass fusing.  This is the result.  It’s printed using glass powder on multiple pieces of clear sheet glass, which are then fused together to make an image /object the viewer can look into.  More to come, but I’m very excited.

Have a great day!

Drew

Nova Artworks

IMG_4093

A big thanks to the Oxford Regional Education Centre Visual Arts in Nova Scotia, Canada for highlighting my woodcuts on their website.  You can check out all of the great things that they do by clicking the link below:

http://www.novaartworks.com/

I’ve been printing a lot recently, but not taking many pictures.  Gotta get on that.

Have a great day,

Drew

Printmaking Residency

1000px-Penland_School_of_Crafts_panorama
Great News!  I’ve been accepted into the winter printmaking residency at Penland School of Crafts in North Carolina.  I’m really excited to spend two weeks in January working on a larger scale woodblock print, have access to state of the art facilities and meet other printmakers.  I’ll make sure to post pictures of my trip and my work as they both unfold.
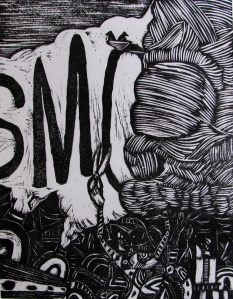
Here is one of my newer prints
KailDrew2
“Smoke”
Have a great day!
Drew

A couple of things

Just a Monday morning update of a few things from over the weekend.  A couple of days ago I posted how I had found one of my first reduction prints while I was sorting through some paper.  The print discovery continues!  This morning I came across a sleeve of prints in which I was experimenting with drypoint etching on broken or previously cut acrylic.

 “Untitled”

All of the prints were completed on oddly shaped acrylic that I purchased at SCRAP.  The idea was to draw freehand on the acrylic with an etching needle and allow the predetermined shape to influence my thoughts.  There are more than this one, however, my camera ran out of batteries after taking this photograph.  The rest will be updated later.

On another note, I wanted to share an image of the linoleum block for one of my next prints.

I cut out the linoleum in preparation for the first color, but as in most of my work, I’m going to keep the final image pretty open to change.  I don’t have a set number of colors, and I’m not sure if all the shapes will stay in the print.  We’ll see.  This piece of linoleum is  leftover from the reduction block I’m currently working on and showing the process of.  The whole piece was a scrap from a black and white block titled “The Area Between”, printed in 2010.  I try to use every remnant of every material to prevent it from ending up in a landfill and also because I feel that even the tiniest scrap can be useful in the creative process.

“The Area Between”

I’ll keep you posted on how this reduction goes as well.

Drew

Copyright©2012 by Drew Kail

The South Waterfront

A quick post today.  Yesterday I was going through some paper in preparation for my possible next print.  I say possible, because I have a lot of ideas right now and don’t know which to tackle first.  Anyway, I was going through some paper and found this print.

“The South Waterfront”

Image size: 4 7/8″ x 4″

This was one of my first reduction prints from a few years ago.  I printed the green and blue at the same time and then carved away to next print the brown and then the black.  It is an edition of seven.  I’m really happy to have rediscovered it.

Have a great day.

Copyright©2012 by Drew Kail

A Look Into My Studio+Reduction Print+Step 6

It’s time for another color.  I’m getting close to the finish, I just haven’t decided on how many more steps to include.  I like to print a color and then ignore the image for a day or so.  That way when I come back to the studio all of the ideas that were influenced by the last printing have somewhat evaporated  and I can look towards the next step more impartially.

On another note, color-wise, we are getting darker.  So todays color is THE closest point of the image to the viewer.  In keeping with the red, blue, orange (and the red+blue combo that is purple), I chose a dark, saturated blue.

 I mixed a little of the previous purple into the blue and expect the last printing to influence the color as well.

I’ve carved out the rest of the background and some of the waving lines up front that I want to remain purple.  Also, I’ve selectively inked the plate to highlight the lighter blue lines in the middle ground and create a water pool as the foreground.

It was actually a relatively light day outside for this time in Portland.  Not sunny, not rainy, just not dark and gray.  I’ll take it.

Now to forget about it for a couple of days, but first, I want to share a brand new addition to my work space.

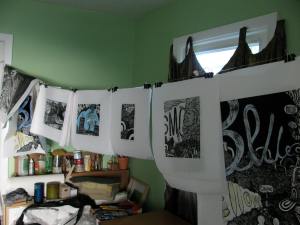
I noticed that the prints weren’t drying as well in the cardboard box recently.  My wife Alyssa and I chalked it up to how humid the house has been with all the late winter Portland rain.  So I made this hanging device.  I used hemp twine and binder clips.  Both were purchased at SCRAP.  The hemp twine I’ve had for a few years and don’t remember how much it was, but the binder clips were something like five cents each.  I use that nice green bag to hold all of my binder clips, and as you can see, I cover my work area with tarps when I’m finished for the day.  This ensures both cat safety and print safety.  I don’t want my little wonders to get into anything I may have missed during cleanup, although I’m pretty thorough, and I don’t want their little hairs all over my work area.  Win-Win.

Until the next color,

Have a nice day.

Copyright© 2012 by Drew Kail